The Coil Stamps of The 1911-1927 Admiral Issue
Overview
The Admiral issue was the first definitive issue to feature regularly issued coil stamps. The previous Edward VII issue did have some experimental coil stamps, but none that were regularly issued to the public.
There were three formats for the coil stamps of this issue:


The Admiral issue was the first definitive issue to feature regularly issued coil stamps. The previous Edward VII issue did have some experimental coil stamps, but none that were regularly issued to the public.
There were three formats for the coil stamps of this issue:
- Perforated 8 Horizontally - Issued only for the first printings of the 1c and 2c values.
- Perforated 8 Vertically - This was the main format used throughout the life of the issue.
- Perforated 12 Horizontally - This was used only for a few values up to 1921.
In addition to these, sheets of the perf. 8 vertical coils were placed on sale to the public, which resulted in part-perforate varieties. The initial issue, which consisted of wet printings of the 1c orange-yellow, 2c dark green and 3c carmine, were available only by favour, and are very rare. The second issue, which is much more readily available consisted of dry printings of the 1c and 2c. Some of these coils, most notably those perforated 8 horizontally, the 3c carmine and the 2c yellow green perf. 12 horizontal are scarce and widely faked. In addition to these, many of the regular coils are also more expensive than the corresponding sheet stamps and can exist trimmed and/or re-perforated. I will discuss what to watch for in this post.
Unitrade lists very few varieties in these coil issues and I believe that a significant opportunity exists for the ambitious specialist. Many collectors are well aware of the many spacing varieties that exist with the later coil issues prepared by the Canadian Bank Note Company, but it is not clear whether such varieties exist for these issues. However, I feel that they must, as they were prepared by the same company.
One very desirable way to collect these issues is in used pairs and strips, as they were generally designed to be used only as singles. The only way they would generally be found as pairs would be if they were used on registered letters to make up higher rates, or if pairs of the 1c were used in place of 2c stamps. A word of caution about condition and perforations. Finding examples with full, even perforations on both sides is very difficult. Often the perforations tore unevenly, even when care is taken to weaken them before separation. Thus, one or two shorter perforations should not deter you from collecting them.
The Perforated 8 Horizontal Coils
These were issued in 1913 and from cancellation dates on used copies that I have examined, seem to have been in use up to about 1920. I have only seen genuine used examples in the early shades of the 1c green and 2c carmine. So for the 1c, that would generally be dark greyish green and dark blue green, while for the 2c, the early shades are rose-red or rose-carmine.
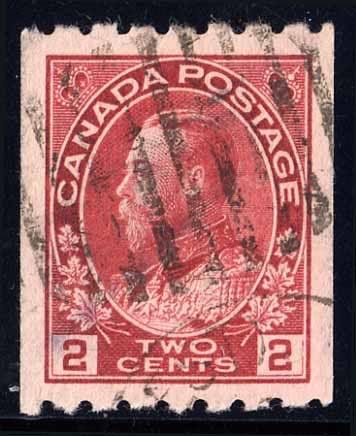
Unitrade lists paste-up pairs for these coils, but does not list shade varieties, even though I am sure that there at least two shades of each value. Because of the catalogue values, especially for used stamps, you have to be on the lookout for faked coils, made from very wide margined sheet stamps or booklet singles, by re-perforating the horizontal edges. I have seen this most often with the 2c deep bright rose red booklet singles taken from the less expensive BK5's, on vertical wove paper, which came out in the early 1920's. Fortunately, in the case of the 2c, the genuine coil stamps all have certain plate characteristics which can be used to identify the genuine stamps. If you look at the above scan and at the vertical line bordering the right numeral box, you will see that it is broken in two places. This characteristic is found on virtually all genuine examples of this coil. The perforations can provide a clue if they do not line up properly with one another, but that being said, there are some excellent fakes out there, that have excellent perforations, which are still fakes. I find that a combination of the above plate characteristics and shades generally are sufficient to identify most of the fakes. Generally, if you see a 1c coil in a shade of just plain green, yellow green or dark yellow green, chances are very good it is not genuine, as the yellow green and dark yellow green shades did not generally appear until after these coils had been phased out. Similarly, if you see a 2c coil in shades of rosine, very deep bright rose red or scarlet, these are likely fakes as well.
The 1c coil is a bit more difficult, as the above plate characteristic does not seem to hold for it. But here, knowledge of the shades and careful examination of the perforations should reveal most of the fakes. The only way to make a fake of this coil is to take either a very wide margined sheet stamp in the deep blue green, or a booklet single and trim the vertical perforations, while perforating the horizontal edges. The booklet singles in this shade are all quite scarce, sought after and valuable in their own right, so they generally would not be used to make fakes. Likewise, the deep blue green and grey-green shades are both scarce and valuable shades in Unitrade, in mint condition, so unless the stamp is a jumbo margined, used stamp, it is unlikely to be used to produce a fake coil.
Perforated 8 Vertically
From the range of values and shades found, it would appear to me that this format was in use right from the very beginning, when coils were first issued in 1912, and in fact, it may well pre-date the horizontal coils. It was in use throughout the life of the issue and was used to produce coil stamps in each of the three low values:
- 1c green
- 1c yellow-orange
- 2c carmine
- 2c green
- 3c brown
- 3c carmine
Both wet and dry printings can be found on each of the later colours, i.e. the 1c yellow-orange, 2c green, and 3c carmine. Curiously, no dry printing of the 3c brown is known, even though this value was issued before the 3c carmine, which exists both ways. In addition to the printing differences, the 1c yellow orange and 3c carmine can be found in both dies 1 and 2. The 1c yellow orange is listed in Unitrade as either yellow-orange or yellow, and in die 1 can be found either wet or dry, with the dry printing being scarce and worth a premium. The die 2 versions so far are only known as dry printings.
A considerable range of shades is to be found on these as with the sheet stamps, and although Unitrade does an OK job of listing them, I feel that their listings are somewhat incomplete. The 1c green can be found in the full range of shades that the sheet stamp is found in, which shows that it was first issued when the first printings of the sheet stamps were released. For some reason that I do not understand, Unitrade assigns only a modest premium to the shade varieties of most of the coils, even though some of the shades are quite a bit scarcer. The 1c coil in the deep blue green or grey greens of the first printing is a good example. Usually, one finds this coil in a shade of green, much like the sheet stamps of 1917-1919, or in a deep yellowish green from the printings made between 1920-1922. The 1c yellow orange can also be found in the full range of shades, from yellow orange, to orange yellow and lemon-yellow, which I think is every bit as scarce as the lemon-yellow sheet stamp. The most common shade is the orange-yellow, which is most often seen on the die 2 stamps. The 2c green and 3c carmine are found in the same range of shades as the sheet stamps and the 3c brown seems to exist with almost the same range, through there are a few shades that I have found on the sheet stamps that do not seem to occur with the coils.
Unitrade lists paste-up pairs, and on these there is a notable difference in the spacing between stamp impressions. From my examination of pairs and strips in my stock, the normal spacing between impressions appears to be 3 mm. However, I am sure that there must be examples that can be found with either a wider, or a narrower space, as well as jump strips, even though none of these are listed in Unitrade.
As far as fakes go, one always has to be careful with used examples of the 1c orange-yellow and 3c carmine, as these list for much more than used sheet stamps in those colours. The other values do not catalogue enough money in my opinion to be worth faking, so generally they should be pretty safe. Mint is a different story. Here, the 1c yellow orange coils should all be pretty safe, since the mint sheet stamps are actually worth more than the coils. However, the same cannot be said of the other values. Although it is best to buy these in pairs, singles should be reasonably safe, as long as the perforations line up perfectly with one another, i.e. if you place a ruler down and join the perforation tooth on one side of the stamp with the tooth on the opposite side, the angle formed by the ruler should be 0 degrees from the horizontal. If it is not, then there is a good chance that it is not genuine. Also, for the 3c brown, check to see that it is a wet printing. As long as it is and the perforations pass the above test, it should be good. The 2c green dry printing is a bit trickier, as fakes can be made by taking the cheap, part perforate coils and trimming them apart in the horizontal direction. The only real test you can employ in this case is to look at the trimmed edges themselves. On the genuine coils, the trimmed edges were produced by a guillotine, which cut in one sweeping motion. The result was a perfectly straight edge. In contrast, whenever you cut something apart with scissors or an exacto blade, it is very difficult to get a perfectly straight edge. So if you have a coil that has a slightly crooked horizontal edge on either side, it has probably started life as a part-perforate coil.
For the 3c carmine, which is an expensive and scarce coil, whether it is mint or used, die type differences can help, as well as printing characteristics. As far as I know, this coil is the only instance of the 3c carmine that can be found as a wet printing. The wet printing coil is only known in die 1, whereas the dry printing coil is always die 2. Thus if you have a wet printing coil single in die 1, it is almost certainly genuine as there are no corresponding sheet or booklet stamps from which a fake can be made. But if it is a dry printing, check the die type. If it is a die 1, then it is almost certainly a fake made by reperforating and trimming a booklet single or large sheet stamp. You have to be especially careful with used. Mint is less risky as the die 2 sheet stamps in mint condition are reasonably valuable in their own right. Again, in most cases the perforations will be a good test.
In addition to outright fakes, you have to be on the lookout for altered examples of end coils that have been re-perforated on the straight edge to produce a coil with perforations on all sides. It was customary for the last stamp in the roll to have no vertical perforations. Since it was not fashionable to collect stamps with straight edges for the longest time, these stamps were often re-perforated to make them more desirable. In all cases, it will be the right edge that you have to watch for.
One great rarity that is found in this issue is the major re-entry that is found on the 1c green. In this re-entry there is dramatic doubling of the entire lower right corner of the design. As far as I know, there is only one damaged used example known.
Perforated 12 Horizontally
This format first appears in about 1915 and lasted only until about 1921. I assume that the reason why it did not endure is that 12 is too fine a perforation for coils to stay on the roll and that they were likely tearing off the roll too easily for the vending machines. It was used only for the:
- 1c green
- 2c carmine
- 2c yellow green
- 3c brown
There appears to be a much lower range of shades on these coils, with the 2c green and 3c brown exhibiting almost no variation at all. The 1c green is only found in the shades that appeared after 1914, so blue green and dark yellow green. Unitrade does list both shades. The 2c carmine is also found only in the shades from after 1914, with rose reds, rosines, deep bright rose reds and scarlets predominating. You will not find genuine examples of either the 1c or the 2c in the early printing shades of the perf. 8 horizontal coils above. If you do find these shades, chances are very high that they are fakes made by trimming sheet stamps.
Unitrade lists two shades each of the 1c and 2c, paste-ups for all values and three varieties that until relatively recently, were not listed:
- The first are the gripper coils. These are identified by a pair of pin-holes that were made by the gripper mechanism and usually appear at the top of the stamps. These are easily faked, so consequently they are only listed on cover.
- The second is the shilling mark variety on the 1c, where some examples show a small dash to the right of the right 1.
- The third is a transfer roll flaw in the "N" of "Cents" in the 2c yellow green.
No spacing varieties are listed for these coils, but I feel that some must exist. Finally, there was an experimental Toronto coil that was issued in 1918. It looks like this:
It was made by punching two larger holes in the horizontal perforations. Because it was issued in 1918, it is generally always found in dark blue green shades.
Of all three coil issues, it is this one which is the most dangerous in terms of fakes. The only two stamps which are not really at risk of being faked are mint examples of the 1c green and 3c brown, since they are worth less than the sheet stamps. However, one has to be careful with used stamps. The big problem with this issue is because it is perforated 12, it is very easy to fake these coils by simply trimming the vertical perforations off an example of a sheet stamp. However, in doing so, most of the fakes obtained will have margins that are smaller than 1 mm on each side. One general observation that I have about this issue is that the total width of both margins combined on these is generally between 3 mm and 4 mm. When they are badly off centre, you may have no margin on one side, but then you will generally get an extraordinarily large 3 mm or 4 mm margin on the other side. If you see a coil with margins that are under 1 mm on each side, chances are it is a fake. Also, the comments I made above about the straightness of guillotined versus cut edges is also applicable here and can be used to identify most fakes. Another important point to note is that all genuine examples of all coil stamps from this issue are wet printings only. Thus any dry printing is a definitely a fake.
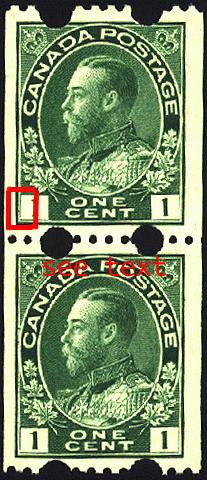
The most troublesome two stamps in this set are the 1c Toronto coil above, and the 2c green. One BNAPS article I have read states that all the genuine examples must come from plate 2, and that the holes should be between 3.25 and 3.5 mm in width and should be 6 mm to 7.5 mm apart. According to the article, they should be yellow green in colour. Below is a genuine example:
To me this is not yellow green, but more a myrtle green. However, the key characteristic is the break at the bottom of the vertical line that borders the left hand numeral box. If this is missing on the example you are looking at, it most likely is a fake. It is thought that only between 5,000 and 8,000 stamps were involved in this 2-day experiment by the post office, so it is very scarce.
The 2c green fortunately has specific plate characteristics, as shown in Marler. I illustrate them below:
These characteristics are found on every single genuine coil. However, there are some sheet stamps that can also be found with all of the characteristics, except for the fourth one:
- There is a weak area in the frameline just to the left of the second maple leaf at left.
- The inner oval is broken just above the King's shoulder and above this.
- There is a tiny dot in the right margin just to the right of the right 2.
Only 250,000 genuine coils were issued, so this is the most widely faked of all the coil stamps. The stamp shown below is an example of a fake:
This stamp does not display any of the above four characteristics, which is the first clue. The margins are reasonably wide, but the edges themselves are the second clue. The left edge, is rough and is from a guillotine, but not the guillotine which was used to produce the coils. The guillotine used to separate post office panes and booklet panes produced rough, straight edges, like the edge shown at left, whereas the guillotine used to produce the coils produced clean, straight edges. The right edge is not perfectly straight and was clearly produced with scissors. This is a straight edged, wet printing sheet stamp that has been trimmed to produce this fake coil.
This concludes my discussion of the coil stamps of this issue. The remaining posts about this issue will address:
- The proof material and imperforates.
- The complete booklets and booklet panes.
- The marginal markings and lathework.
- Plate blocks, multiples and strips.
- The postal history.
- The issued Imperforates and Part Perforate Coils.
- The 1926 Surcharges.
- The War Tax Stamps.
If you would like to view the Admiral material that I have available for sale, please click on the following link:

Comments
Post a Comment