The 6c Black Transportation Stamp of the 1967-73 Centennial Issue Part Three
This week's post comes a few days late, as I was away on a much needed mini-getaway to Vancouver for the Victoria Day weekend. This week, I will discuss the booklet stamps that were issued for the 6c black transportation design between January 1970 and the end of 1972.
These stamps were issued in 25c booklets and in $1.50 booklets. All of the booklets so produced, were printed by the BABN. There were seven basic booklets issued during this period:


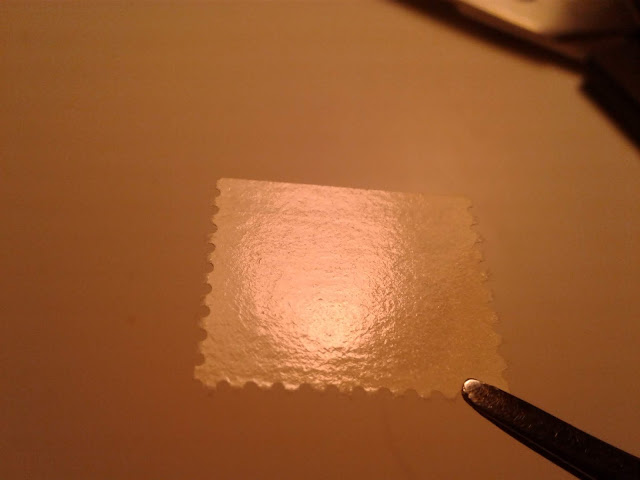


All of the stamps and booklet panes that I have examined are printed on dull fluorescent paper, that appears greyish under UV light, and contains no visible fluorescent fibres, as shown above.


The booklet and single stamp in the middle have PVA gum, while the two stamps on the right are dextrose gum stamps. Although the dex gum stamps appear slightly greyer in the picture, they actually look exactly the same as the other stamps. All appear dull fluorescent greyish under UV light.


Note how the tagging bars on this booklet do not extend all the way to the top of the tab on the pane. Below is an example of another printing in which the tag bar runs the full length of the pane.


These stamps were issued in 25c booklets and in $1.50 booklets. All of the booklets so produced, were printed by the BABN. There were seven basic booklets issued during this period:
- A $1.50 booklet containing 25 of the 6c die 1 stamps, perf. 12.5 x 12, which was issued in December 1970.
- A $1.50 booklet containing 25 of the 6c die 1 stamps, perf. 10 (actually 9.9), which was issued in January 1970.
- A 25c booklet containing 4 of the 6c die 2 stamps, perf. 12.5 x 12, which was issued on November 1970.
- A 25c booklet containing 4 of the 6c die 2 stamps, perf. 10 (actually 9.9), which was issued in May 1970.
- A 25c booklet containing 2 of the 8c parliamentary library, 3 of the 1c Northern Lights and dogsled and one 6c die 2 stamp, perf. 12.5 x 12. These were first issued on December 31, 1971.
- A 50c booklet containing five of the 8c parliamentary library, four of the 1c Northern Lights and dogsled, and one 6c die 2 stamp. These were issued in 1972.
- A $1 booklet containing 11 8c parliamentary library, six of the 1c Northern Lights and dogsled team and 1 6c die 2 stamp. This booklet was issued on December 30, 1971.
Each of these booklets utilized different types of paper and gum. The remainder of this post will look at these stamps in detail.
Die 1 Stamps, Perforated 9.9, From $1.50 Booklets - Unitrade #460g, gi, gii and giii
Paper Characteristics Other Than Fluorescence
Like most of the BABN stamps, the paper used is a soft horizontal wove paper. Except for the hibrite paper, which is a bright white colour, the paper is generally a light cream colour when viewed against a stark white background. The paper has a smooth appearance under magnification, and a very light surface coating can be seen on the paper surface. There are two different types of paper that possess the same characteristics above, but differ in terms of how the paper appears when viewed against strong back-lighting:
- One type of paper shows no mesh pattern whatsoever, when viewed against strong back lighting.
- The other shows a clear vertical mesh pattern when viewed against strong back lighting.
Paper Fluorescence
Both Unitrade and McCann list the fluorescence on these booklets differently. Unitrade lists four different levels of fluorescence:
- Non-fluorescent, or dead.
- Low fluorescent,
- Medium fluorescent, and
- Hibrite
McCann, on the other hand, lists five levels of fluorescence:
- Dull fluorescent,
- Low fluorescent.
- Low fluorescent with fibres.
- Medium fluorescent.
- Hibrite.
Unfortunately, I do not have examples of either the hibrite, or the medium fluorescent papers that I can show here. I will add them when they become available.
However, I have found many varieties of dull and low fluorescent paper. There is a dull fluorescent greyish paper, which is very close to dead, but I do not think that it is dark enough to be a true non-fluorescent. I believe this is the reason why Unitrade lists it as non-fluorescent, while McCann lists it as dull fluorescent.
Unitrade appears to completely ignore the fact that many of the papers are actually flecked and contain fluorescent fibres. This makes their listings somewhat confusing, since it suggests that the low fluorescent and medium fluorescent papers do not contain fluorescent fibres. I have indeed found a variety of low fluorescent paper without these fibres, but the vast majority of the low fluorescent stamps derive their apparent fluorescence from the fluorescent fibres contained in the paper. In reality, there are, I believe:
- Dull fluorescent papers without fluorescent fibres.
- Dull fluorescent papers with fluorescent fibres.
- Low fluorescent papers without fluorescent fibres.
- Low fluorescent papers with fluorescent fibres.
- Medium fluorescent papers.
- Hibrite papers.
The pictures below illustrate some of the paper varieties that I have found:

The booklet on the left is printed on a dull fluorescent greyish paper and contains a very sparse concentration of low fluorescent fibres, and very few medium fluorescent fibres. The fibres are not sufficient in quantity, or brightness to alter the perceived fluorescence of the paper from dull fluorescent. The booklet pane on the right is printed on a dull fluorescent greyish white paper, but contains a sparse concentration of low fluorescent fibres and a very sparse concentration of medium fluorescent fibres. Together, these fibres, make the paper appear low fluorescent overall.
The next picture shows two varieties of the dull fluorescent paper: a deep grey and the greyish white under UV light:

The greyish white paper is shown on the left, while the deep grey paper is shown on the right. Neither paper contains any visible fluorescent fibres.
In the next picture, a dull fluorescent paper containing some fluorescent fibres is shown to the right of the above two stamps:

The new stamp is shown on the right. As you can see, while it is a little brighter than the deep grey stamp, it is not anywhere near low fluorescent on the scale. It is still a variation of dull fluorescent paper. It contains very few low fluorescent fibres.
The picture below shows three varieties of dull fluorescent flecked paper. All three varieties contain very sparse concentrations of low fluorescent fibres:

The upper left stamp is dull fluorescent Ivory, while the right one is dull fluorescent grey. The bottom stamp is dull fluorescent greyish white.
The next three pictures show three varieties of the low fluorescent, flecked paper:

This paper is a dull fluorescent greyish colour under UV. The paper contains a sparse concentration of low fluorescent fibres and very few medium fluorescent fibres. There are a sufficient number of fibres present to make the paper appear low fluorescent overall.
Now, for the next variety:

This paper also appears dull fluorescent greyish under UV light, but the concentration of fluorescent fibres in the paper is greater: this one contains a low density concentration of low fluorescent fibres and a very sparse concentration of medium fluorescent fibres.
Lastly, we have the third variety

This paper is dull fluorescent greyish under UV, but contains a sparse concentration of low fluorescent fibres and very few medium fluorescent ones. These just raise the overall perceived fluorescence level from dull fluorescent to low fluorescent.
So, here I have identified ten, very close varieties of dull and low fluorescent paper. So, if we assume that there is only one variety of each of the medium fluorescent and hibrite papers, this means that there are at least a dozen different kinds of fluorescent papers.
Shades
I have not seen any noticeable differences in the shade of black ink used to print these booklets. All of the booklets that I examined are a clear grey-black that contains a silvery undertone.
Gum
In my examination of these booklets and the stamps within them, I have found three types of dextrose gum:
- A crackly white gum with a satin sheen.
- A smooth, white gum with a semi-gloss sheen.
- A smooth, white gum with a glossy sheen.
The following pictures show the differences between each type clearly:

Here is one view of a full booklet pane showing the crackly dextrose gum. The picture below shows another view of the same gum type on a different pane:

This picture shows very clearly, the fine crack pattern in the gum, and the satin sheen.
The next picture shows the semi-gloss smooth gum:

This gum shows fine horizontal ridges, that resemble brush strokes.
Then, we have the shiny, high gloss gum:

Here, the gum is completely smooth, with no ridges or apparent brush strokes. It is highly glossy, reflecting lots of light.
The gum types do not appear to be limited to any particular fluorescence level. Thus, it would seem that any variety of paper can be found with all three types of gum, though a thorough study would be needed to establish whether or not this is the case.
Perforation
Unitrade lists the perforation on these booklets as 10 comb. However, McCann notes the actual perforation as being 9.9 comb. The panes did not have any straight edge at the side, rather the panes were guillotined apart along the perforations. However, when the guillotining was out of register, it is possible to see straight edges on the sides where the perforations were completely trimmed off. But usually, the perforations are visible, but trimmed.
Plate Flaws
Unitrade does not list any plate flaws on these stamps, however McCann lists a "vertical scratches on 6th row variety". This was first discovered by the late specialist Mike Painter and it is thought to have affected all 12 booklets that would have fit around the printing cylinder. The variety consists of between 15 and 21 short, vertical scratches that are distributed throughout the design of the three stamps across row 6 of the booklets affected. Mike Painter identified 12 different patterns of scratches, according to where the scratches fall on the design:
- Pattern A: 19 scratches including two small parallel scratches in the outer margin of the left stamp, two scratches one above the other to the right of the Queen on the first and third stamps, and two sets of two scratches to the right of the Queen on the middle stamp.
- Pattern B: 21 scratches including 3 small scratches in the outer left margin of the right stamp, three small scratches to the right of the Queen on the left and middle stamps, and two small scratches along the right inner frameline of the middle stamp, opposite the Queen.
- Pattern C: 17 scratches including scratches in the outer margins of all three stamps including: two in the left margin of the left stamp, one in the middle of the perforations between the left and middle stamps, two sets of two scratches in the right margin of the middle stamp and one set of 2 scratches inside the right margin of the right stamp.
- Pattern D: 15 scratches including 2 scratches inside the outer margins of the left and right stamps, one set of 2 scratches in the margins between the middle and right stamps and one single scratch in the margins between the left and middle stamps.
- Pattern E: 20 scratches. The easiest way to identify this pattern is to look at the scratches to the right of the Queen. The left stamp will have three small scratches to the right of the Queen, and another three in a column, just outside the right frameline of the left stamp, in approximately the same location. The middle stamp has three short scratches to the right of the Queen. Finally, on the right stamp there is 1 scratch just to the right of the Queen's hair, and then another one half way between the Queen and the right frameline.
- Pattern F: 18 scratches. Again, I find the scratches to the right of the Queen to be the easiest way to identify this pattern. On the left stamp there are two sets of scratches to the right of the Queen 2 and then 3, both arranged in a column. On the middle stamp, there are 2 columns of 2 scratches spaced apart, to the right of the Queen. Then on the right stamp is a tiny scratch just outside the right vertical frameline.
- Pattern G: 17 scratches. On this pattern, it is the scratches inside the stamps' margins that are the best aid to identification. On the left stamp are two closely spaced columns of scratches in the left margin. In the middle of the margin between the left and middle stamps are 5 scratches: one in the middle of the perfs, one column of three in the left margin of the middle stamp, and a short scratch to the left of the column of 3 near the bottom. Then there is a column of 3 scratches in the right margin of the middle stamp and two short scratches in the left margin of the right stamp. Finally there are two very closely spaced columns of 2 scratches inside the right margin of the right stamp, just to the right of the frameline.
- Pattern H: 19 scratches. The easiest way to identify this is to look at the scratches through the Queen's lips. On the left stamp, there are two columns of 2 scratches, spaced apart that pass through the Queen's lips. Pattern G has a similar set of scratches, but there is no bottom scratch on the lower left side of the Queen's lips. On the middle stamp there are no scratches on the lips, whereas pattern G has one long scratch. There are also no scratches on the right stamp near the lips.
- Pattern I: 20 scratches. There are no scratches that pass through the Queen's lips on any of the three stamps. The middle and right stamps do both have a column of 2 scratches to the right of the lips, but they are quite far from the lips. The only other pattern that is similar to this is Pattern D. But in Pattern D, the middle stamp has a scratch very close to the lips on the left side. On Pattern D, there are no scratches near to the right side of the lips as there is in this pattern.
- Pattern J: 18 scratches. This pattern is the only one where there is a single column of 2 scratches passing through the Queen's lips on all three stamps. On the left stamps, the scratches pass through the middle of the lips, whereas on the other two they are toward the left of the lips.
- Pattern K: 16 scratches. This pattern shows a single column of two scratches passing through the Queen's lips in the middle, on both the left and centre stamps, while there are no scratches in the lips on the right stamp. On the other patterns, there are either no scratches on the Queens lips of these first two stamps, or there are two columns of 2, or a single column, but not in the middle of the lips.
- Pattern L: 17 scratches. Again, I would focus on the scratches near the Queen's lips. On the left stamps, no dashes pass through the lips, but there is one column of 2 dashes to the right of the lips. Same on the middle stamp. On the right stamp there are two closely spaced columns of 2 dashes passing through the lips so that the right column just passes through the right side edge of the lips. This is completely distinct to this pattern.
Of course, the detail above may not be sufficient to identify individual mint or used stamps. In that case, you would need to look at Mike Painter's original sketches of these patterns, which are contained in the April 1995 BNAPS newsletter for the Centennial Study Group.
Die 1 Stamps, Perforated 12.5 x 12, From $1.50 Booklets - Unitrade #460bs
Paper Characteristics Other Than Fluorescence
The paper used to print this booklet appears to be the same as that used for the previous perf. 9.9 booklet. I only have one booklet available for examination, and mine shows the paper that displays the vertical mesh against back lighting. However, it is quite probable that it can be found with the no mesh pattern as well.
Paper Fluorescence
Unitrade only lists this booklet as existing on dull fluorescent paper. McCann lists a medium fluorescent variety for this booklet, though I must say that I have never seen anything other than dull fluorescent paper that contains no fluorescent fibres.
The picture below shows the only booklet that I have and clearly shows that under UV light, the paper is a dull fluorescent greyish white:

There very likely are other varieties of dull fluorescent paper, in addition to McCann's medium fluorescent paper. I will be sure to illustrate these as I am in a position to examine more and more booklets.
Shades
The shade of ink used to print these booklets is more or less the same as that used for the previous booklets, except possibly a little more intense. The black has the same silver grey undertone.
Gum
The gum that is on the booklet that I examined is the semi-gloss dextrine gum that shows what appear to be horizontal brushstrokes. The other two varieties of gum may exist on these as well, but I cannot be certain at this point.
Perforation
Unitrade lists the perforation on these booklets as 12.5 x 12 comb. However, McCann notes the actual perforation as being 12.4 x 11.9 comb. The panes did not have any straight edge at the side, rather the panes were guillotined apart along the perforations. However, when the guillotining was out of register, it is possible to see straight edges on the sides where the perforations were completely trimmed off. But usually, the perforations are visible, but trimmed.
Plate Flaws
Like the previous booklet, this booklet exists with the vertical scratches in the 6th row, in the 12 different patterns. In addition, McCann lists a "mole on lip" or a "mole on nose", which can be found on any of the three stamps in the 6th row.
Die 2 Stamps, Perforated 9.9, From 25c Booklets - Unitrade #460h
Paper Characteristics Other Than Fluorescence
The paper used to print these booklets and the stamps in them is similar in all respects to the $1.50 booklets. It is a light cream colour, when viewed against a stark white background, and has a smooth, finished printing surface, that has a very light surface coating, which can be seen under magnification. Very, very light vertical ribbing is visible on the surface, when the stamps are held at an angle to the light source. This ribbing is highly visible as a vertical mesh pattern, when the stamps are held up to a strong back light.
Paper Fluorescence

All of the stamps and booklet panes that I have examined are printed on dull fluorescent paper, that appears greyish under UV light, and contains no visible fluorescent fibres, as shown above.
Shades

The stamps from these booklets are printed in the intense black that is characteristic of the die 2 stamps. There is no silver, nor no greyish tone to the black. It is a very uniform colour, in the sense that I have not seen any significant variation in the colour on any of the stamps or booklets that I have examined.
Gum
I have found two of the three previously described varieties of dextrose gum: the crackly gum and the semi-gloss gum. The picture below shows the two types on single stamps from these booklets:

The top stamp is the crackly gum, while the bottom stamp is the semi-gloss gum.
Perforation
Unitrade lists this booklet as being comb perf. 10. However, it is actually comb perf. 9.9, as McCann points out.
Plate Flaws
There are no known or listed plate flaws on these stamps as far as I know. Neither McCann, nor unitrade list any varieties.
Die 2 Stamps, Perforated 12.5 x 12, From 25c Booklets - Unitrade #460ds and dis
Paper Characteristics Other Than Fluorescence
The paper used to print these stamps is a horizontal wove paper that shows no ribbing on the surface and no vertical mesh pattern when held up to a strong back light. The colour of the paper is a light cream when viewed against a stark white background. Under magnification the printing surface is smooth and finished with a very light coating that prevents stray fibres from forming on the paper surface.
Paper Fluorescence
Both Unitrade and McCann list this stamp as existing only on dull fluorescent paper. Indeed, both the dextrose gum stamps and PVA gum stamps seem to all exist on paper that appears dull fluorescent greyish under UV light, with no fluorescent fibres, as shown below:

The booklet and single stamp in the middle have PVA gum, while the two stamps on the right are dextrose gum stamps. Although the dex gum stamps appear slightly greyer in the picture, they actually look exactly the same as the other stamps. All appear dull fluorescent greyish under UV light.
Shades
The shade of blank ink used to print these booklets does not appear to vary at all between the PVA gum and dextrose gum printings. It is the same intense black that was used to print the previous perf. 9.9 die 2 booklets.
Gum
The dextrose gum that I found on these is slightly crackly, but smooth like the other semi-gloss gum I discussed earlier. It actually appears to be a hybrid, combining the crackly gum with the semi-gloss gum. The picture below shows this gum type on two stamps:

Note the somewhat crackly nature of the gum and the lack of "brush strokes". At the same time, note the sheen.
The PVA gum is a cream colour and is quite shiny compared to other PVA gums, such as what is found on the later printings of the 6c. It is quite thick and draws the top and bottom of the stamps together, causing mint stamps to curl. A picture of this gum is shown below:

Perforation
The perforation is listed in Unitrade as 12.5 x 12. However, According to McCann, the exact gauge is 12.4 x 11.9. I have not found any variation in the perforation on these stamps.
Plate Flaws
There are no plate flaws of varieties of this stamp listed in either McCann or Unitrade.
Die 2 Stamps, Perforated 12.5 x 12, From 25c Booklets - Unitrade #460cx-cxvi, #460cpx-cpxviii
Paper Characteristics Other Than Fluorescence - Non Themed Cover Booklets BK69a-y
The paper used for these stamps has a slightly whiter appearance on the front, when viewed against a black background. McCann lists two sub-types of this paper:
- A vertical ribbed paper in which the ribbing is only faintly visible on the paper surface, but becomes very pronounced, when the stamps are viewed against strong back-lighting. This is a vertical wove paper, and it has a very smooth, uncoated surface. Occasionally, little minute depressions are visible in the paper's surface.
- A vertical wove paper that does not show any ribbing at all, even when viewed against strong backlighting. This paper appears almost as smooth under magnification, as the first paper above, but loose fibres are visible on the paper surface, under magnification.
Paper Fluorescence - Non Themed Cover Booklets
According to Unitrade, the paper used on these booklets exists in five grades of fluorescence, while according to McCann, the number of grades of fluorescence that are reported to exist, depends on whether or not the paper is the ribbed paper or not:
- Ribbed paper is reported to exist in low, medium and high fluorescent grades.
- Smooth (non-ribbed) paper is reported to exist in low, medium, high fluorescent and hibrite grades.
According to McCann, none of these booklets exist with dull fluorescent paper. Thus it is logical to conclude that Unitrade's dull fluorescent listings for these booklet stamps, must have come from the later printings with the 10 cover designs in brown.
The picture below shows the low fluorescent, high fluorescent and hibrite papers, as listed by McCann:

The lighting conditions in which this picture was taken make everything look a little duller than it is. For instance, the low fluorescent paper in this picture appears dull, but is actually low fluorescent.
- The low fluorescent paper appears a greyish white colour on the front, and a bluish white colour on the back under UV light. There are a few brownish woodpulp fibres visible here and there on the paper, but not many. There is what can best be described as a low density concentration of low fluorescent fibres, and a sparse concentration of medium fluorescent fibres visible in the paper.
- The medium fluorescent paper is a greyish colour under UV, but has a medium density concentration of medium fluorescent fibres that give it a medium fluorescent appearance.
- The high fluorescent paper is a greyish white colour under UV, but has a medium density concentration of low and medium fluorescent fibres, which makes it appear as high fluorescent. There are no brownish woodpulp fibres visible in this paper.
- The hibrite paper is a medium fluorescent bluish white colour under UV, but there is a high density concentration of medium and high fluorescent fibres that make the paper appear hibrite overall.
Tagging - Non-Themed Cover Booklets
According to McCann, there were some printings that were made with 4 mm OP-4 tagging that gave a light green glow under UV, as shown in the picture above. He lists the tagged stamps as existing on three types of paper:
- Smooth, medium fluorescent.
- Smooth, high fluorescent.
- Ribbed, high fluorescent.
Paper Characteristics Other Than Fluorescence - Themed Cover Booklets - BK69aa-as
There were two basic types of paper used to produce these booklets:
- A horizontal wove paper that shows no ribbing on the surface and in fact is smooth, and under magnification appears to have a very light surface coating.
- A horizontal wove paper that shows clear vertical ribbing on the face, that is not visible in back-lighting, but can be easily seen under magnification, and to a lesser extent, by viewing stamps at an angle to the light. The ribbed paper appears to also have a very light surface coating.
McCann makes no specific mention of this difference on these booklets, but only those with the plain covers, issued earlier. Neither does Unitrade. Unitrade only acknowledges ribbed paper on BK71, but it very clearly exists on these booklets. What is not clear from the study I have done, is what the full range of tagging and fluorescence varieties is on this paper type. I have found dull paper, with no tagging and high fluorescent paper with OP-2 tagging, which I will illustrate and describe. But so far, that is all I have found in looking through over 100 booklets. However, that is a very small sample, and there may well be, and probably are, more varieties.
Paper Fluorescence - Themed Cover Booklets
Paper Fluorescence - Themed Cover Booklets
According to Unitrade and McCann, the untagged stamps exist with all the major grades of fluorescence:
The various pictures below show some of these varieties, which I will attempt to describe, as the same overall fluorescence level can show differences in terms of the overall colour under UV, as well as the concentration and brightness of fluorescent fibres contained within the paper, as well as brownish woodpulp flecks.
We will begin with the medium and high fluorescent papers on the OP-4 tagged booklets:
- Dull fluorescent
- Low fluorescent
- Medium fluorescent
- High fluorescent
- Hibrite
According to Unitrade and McCann, the OP-4 tagged stamps exist only with low, medium and high fluorescence, while the OP-2 stamps exist with five grades of fluorescence:
- Dead (non-fluorescent)
- Dull fluorescent
- Low fluorescent - Unitrade does not list this, but McCann does.
- Medium fluorescent
- High fluorescent
These discrepancies are useful in assisting collectors in the task of distinguishing the different levels of fluorescence. For example, neither of the tagged stamps are reported to exist with the hibrite paper, which suggests that if you come across panes that are tagged, that appear to be hibrite, chances are they are high fluorescent, rather than hibrite. Likewise the dead paper is only reported to exist on the OP-2 tagged panes, so that panes that untagged panes on apparently dead paper, are probably just dull. Starting your study with the OP-4 tagged panes is useful because they do not include the fluorescence levels at the extreme ends of the scale, i.e. no dull, no dead and no hibrite. So if you have enough of them to sort, you can get a good feel for the differences between low, medium and high fluorescent papers.
Because neither McCann, nor Unitrade differentiate between smooth and ribbed papers, it is not clear whether some of these levels of fluorescence exist only with one type of paper and not the other, or whether they exist with both.
The various pictures below show some of these varieties, which I will attempt to describe, as the same overall fluorescence level can show differences in terms of the overall colour under UV, as well as the concentration and brightness of fluorescent fibres contained within the paper, as well as brownish woodpulp flecks.
We will begin with the medium and high fluorescent papers on the OP-4 tagged booklets:

The high fluorescent paper is on the left. It is basically a medium fluorescent bluish white paper under UV that contains a low density concentration of high florescent fibres, which give the paper an overall high fluorescent appearance. On the back, the paper appears bright white, and under magnification you can see a medium to high density mass of fluorescent fibres that do not stand out, which suggests that on the back the paper is high fluorescent, and the fibres are high fluorescent.
The medium fluorescent paper is shown on the right. It is a dull fluorescent greyish paper under UV that contains a low density concentration of low fluorescent fibres and a sparse concentration of medium fluorescent fibres, that give it an overall appearance of being medium fluorescent. If we look at the back of the pane, we see that the paper is also dull fluorescent greyish, with a medium density concentration of low fluorescent fibres and a low density concentration of medium fluorescent fibres. These give the paper a medium fluorescent bluish white appearance overall, as seen from the back. I don't think there is really any difference in fluorescence levels on the front and back, but the true fluorescence shows more clearly on the back, without the printed design to distract our eyes.
Next, we have an untagged pane on smooth, high fluorescent paper and an OP-2 tagged pane on smooth medium fluorescent paper:

The booklet on the right is an example of the OP-2 tagging on medium fluorescent paper, while the untagged pane on the left is on high fluorescent paper:
- The high fluorescent paper is actually a dull fluorescent greyish paper that contains a medium density concentration of low, medium and high fluorescent fibres. Together, these give it the appearance of being HF. On the back, the paper is dull fluorescent greyish, with a low density concentration, of low, medium and high fluorescent fibres that give the paper an overall HF appearance. This paper is clearly different from that used on the OP-4 booklets in that the colour under UV is bluish white rather than white, and the fluorescent fibres show up much more clearly because the ambient level of fluorescence in the paper is only dull.
- The medium fluorescent paper is a dull fluorescent greyish paper containing a low density concentration of low fluorescent fibres, a sparse concentration of medium fluorescent fibres, and a sparse concentration of brownish woodpulp fibres. Together, these give the paper an overall MF appearance. On the back, the paper is dull fluorescent greyish with a low density concentration of low fluorescent fibres and a sparse concentration of medium fluorescent fibres, that give it an overall MF appearance. Again, this paper is slightly different from that used to produce the OP-4 tagged booklets on MF paper, in that the concentrations of low fluorescent fibres and medium fluorescent fibres are lower, which gives it a bluish appearance under UV, rather than a bluish white appearance.
Now lets take a look at two of the ribbed papers: one on dull paper, and the other on medium fluorescent paper with OP-2 tagging:

The dull paper is shown on the left. The type shown here is actually a non-fluorescent violet paper under UV that contains a low density concentration of low fluorescent fibres, which raises the fluorescence level overall from dead to dull. It appears exactly the same on the back and the front.
The medium fluorescent paper used on this printing is different again slightly from the other medium fluorescent papers shown so far. On the back, it is still bluish, but clearly brighter than the other OP-2 booklet with the short tagging bars, but not quite as bright as the OP-4 booklet, which suggests to me that the ambient level of fluorescence is a little higher, like say a dull fluorescent greyish white, rather than a grey. There appears to be a medium density concentration of low fluorescent fibres, and a low density concentration of medium fluorescent fibres, visible in the paper. So there is a higher concentration of fibres in this paper than the OP-2 paper. But overall, it is still medium fluorescent.
This leaves low fluorescent paper, and hibrite paper, which I haven't shown yet. Unfortunately I do not have a hibrite example to show here, but will add one when I come across it. Fortunately I do have two very slightly different low fluorescent papers: one smooth, with OP-2 tagging, and the other ribbed without tagging. The pictures below show both types. Please note that although the picture shows 1c stamps, the 6c stamps taken from the same booklet will look identical, in terms of their fluorescence. :

Clearly the tagged pair looks a little brighter than the right stamp, but it is not bright enough to be medium fluorescent. The overall appearance of the tagged pair on the front is bluish, but under magnification you can see you can see that the paper is a dull fluorescent deep grey, with, what seems to be a sparse concentration of medium fluorescent fibres that are raising the overall perceived fluorescence level from dull to low. The stamp on the right appears dull fluorescent grey under UV, with a sparse concentration of both medium fluorescent fibres and brownish woodpulp specks, that overall, raise the perceived fluorescence from dull to low.
Let's take a look at the backs:

On the tagged pair, the paper appears bluish white overall. Under magnification, it is clear that the ambient fluorescence level is dull fluorescent greyish white. There is a low density concentration of low fluorescent fibres, and a sparse concentration of medium fluorescent fibres, as well as a very few brownish woodpulp fibres that give it a MF appearance on the back only.
The stamp on the right is dull fluorescent deep greyish under UV, with a low density concentration of low fluorescent fibres, a sparse concentration of medium fluorescent fibres and a sparse concentration of brownish woodpulp flecks. Overall this gives a low fluorescent greyish appearance.
So far, all of the booklets from this group that I have looked at do not show significant levels of brownish woodpulp fibre in the paper. The woodpulp fibres are something that we typically see in stamps issued between 1972 and about 1974. As we shall see, BK71 is printed on paper that usually shows the same level of woodpulp fibres as the stamp shown above does. So it is possible that it comes from BK71 rather than BK69. However, BK69 would have been issued until the 25c Caricature booklet replaced it in April 1974. So what seems much more likely to me is that the initial printings of these booklets were on smooth paper, and then the last printings, made between 1972 and 1974 were on the ribbed paper. This seems consistent with my observation that there are no OP-4 tagged booklets with ribbed paper, as OP-4 tagging had been replaced by OP-2 at this point. Most all of the fluorescence levels found in the period from 1971 to 1972 are also found up until 1974, so I would think that the ribbed papers and smooth papers would exist with the same levels of fluorescence.
Tagging - Themed Cover Booklets
There were three two types of tagging found on these booklets:
- A pale green OP-4 tagging that was 4 mm wide, as shown above, and
- A bright greenish yellow OP-2 tagging that was 3 mm wide and shown below
Note how the tagging bars on this booklet do not extend all the way to the top of the tab on the pane. Below is an example of another printing in which the tag bar runs the full length of the pane.
Distinguishing the tagging can be difficult for some collectors because the OP-4 tagging on these booklets does not show the same fading and migration that OP-4 tagging on the 1972-78 Caricature issue shows. However, it does migrate onto the booklet covers, and if you examine the covers of complete booklets, you can usually see some evidence of migration from the panes. In any event, the OP-4 tagging is generally always a pale green under UV and is 4 mm wide, whereas the OP-2 has more of a bright yellow appearance, and is always 3 mm wide.
Paper Characteristics Other Than Fluorescence - $1 Booklet BK70

Paper Characteristics Other Than Fluorescence - $1 Booklet BK70
The paper used for these booklets is a horizontal wove that shows clear vertical ribbing when viewed against strong back-lighting. Under magnification, there appears to be a very light coating on the paper surface that gives it a satin sheen, and the ribbing is very faintly visible. The paper appears noticeably creamy when viewed against a white background:

You can clearly see that the paper is off-white, though it is not as creamy as the paper from BK66 and BK68 for instance.
Paper Fluorescence - $1 Booklet - BK70

The paper used to print these booklets is a dull fluorescent paper, that contains no visible fluorescent fibres, nor any brownish woodpulp flecks. Under UV it appears a greyish colour.
Tagging - $1 Booklet - BK70
Some of the booklets issued had 4 mm OP-4 tagging that glowed light green as shown in the picture above.
The paper used to print these booklets is a vertical wove paper that is very strongly ribbed, with the vertical ribbing being very obvious when the stamps are examined under magnification, viewed at an angle to the light, or viewed against strong back-lighting. The printed surface of the paper appears very smooth under 10x magnification, but uncoated and somewhat porous.

Paper Characteristics Other Than Fluorescence - 50c Booklets - BK71
Paper Fluorescence - 50c Booklets - BK71
Both Unitrade and McCann list two grades of fluorescence: low and medium. However, there are actually at least four types of paper, which are close variations of the two basic varieties. Before I get into those, I will illustrate the two basic types of paper fluorescence in the picture below:

The medium fluorescent paper is shown on the left, and the low fluorescent paper on the right. Again, the lighting conditions make both papers appear less bright than they actually are.
Both papers contain brownish woodpulp fibres, as well as fluorescent fibres. So the variations of paper that exist, in addition to the basic two shown above, are those in which the concentration and brightness of these additional elements varies as follows:
- One paper is dull fluorescent greyish under UV, with a low density concentration of low fluorescent fibres, a sparse concentration of medium fluorescent fibres, a very sparse concentration of high fluorescent fibres and a sparse concentration of brownish woodpulp fibres. Together, these give the overall appearance of medium fluorescent paper.
- One paper is dull fluorescent greyish white under UV, with a low density concentration of low fluorescent fibres, a sparse concentration of medium fluorescent fibres, very few high fluorescent fibres and a sparse concentration of brownish woodpulp fibres. Together, these give the overall appearance of medium fluorescent paper.
- One paper is dull fluorescent deep grey under UV, with a low density concentration of low fluorescent fibres, a very sparse concentration of medium fluorescent fibres, and a sparse concentration of brownish woodpulp fibres. Together, these give the overall appearance of low fluorescent paper.
- One paper is dull fluorescent greyish under UV, with a sparse concentration of low fluorescent fibres, a very sparse concentration of medium fluorescent fibres, and a sparse concentration of brownish woodpulp fibres. Together, these give the overall appearance of low fluorescent paper.
Tagging - 50c Booklets - BK71

Some of the booklets printed exist with OP-4 Ottawa tagging as shown above. However, instead of the bands being 4 mm wide as before, the bands are always 3 mm wide. The picture above shows both types of paper, with the medium fluorescent paper on the top, and the low fluorescent paper on the bottom. Note how much brighter and yellowish the tagging of the top pair appears, as compared to the pale green tagging of the bottom pair. Again, the top pairs are not the 6c stamps, but it should be noted that the 6c stamps will exhibit the same paper fluorescence and tagging as the above pairs.
Shades
I have not noted any significant variation in the shades of the black used to print these stamps. All the stamps that I looked at are printed in the same shade of intense black that all the other die 2 stamps are found with.
Gum - 25c Booklets - BK69's
The gum used on the printings from the first, non-themed cover booklets was a whiter PVA, with a satin sheen. Later, with the themed cover booklets, the gum takes on a slightly creamier, but still very white appearance.
Gum - $1 Booklets - BK70
The gum used for these booklets is very distinct. It is a thick PVA that had a semi-gloss sheen, almost appearing to be a cross between dextrose gum and PVA. The thickness of this gum usually causes stamps with it to curl horizontally.
Gum - 50c Booklets - BK71
The gum found on these stamps is a white PVA with a satin sheen.
Perforation
Unitrade lists the perforation as comb 12.5 x 12. However, McCann notes that the exact gauge is 12.4 x 11.9.
Plate Flaws
There are no specific listed, constant plate flaws that affect this stamp, that are listed in either McCann, or Unitrade. That being said, McCann does note that a number of non-constant flaws, scratches and inking flaws can be found on any of the 25c, 50c and $1 booklets that were issued between 1971 and 1972. I have not come across any of note among my stock. However, I will be sure to add images of any that I come across in due course.
Conclusions: Sorting Single Booklet Stamps
As we have seen, despite the apparent similarities of the booklet stamps, there are characteristics of each booklet that allow us to assign individual stamps to a particular booklet.
If you have pairs of stamps from a booklet, it may possible to assign those to a particular booklet right away, based on the layout of the stamps, which are specific to a particular type of booklet:
- A vertical pair of the 1c and 6c, with the 6c on the bottom can come from either BK69, or BK70, but if it comes from BK70, the pair will be heavily folded from where the pane was folded originally.
- A vertical pair of the 1c and 6c, with the 6c on top can only come from BK71.
- A horizontal pair of the 1c and 6c must come from BK69.
In terms of sorting singles, the gum is the best attribute to start with, if you are sorting mint stamps:
- If the the gum is white PVA it comes from either BK69 or BK71.
- If the gum is the thick shiny PVA with the cream colour that causes the stamps to curl horizontally, then it is from BK70.
So, after doing this sort, the task that remains is to sort the BK69 from BK71 singles. The next best characteristic to do this in my opinion is to look for brownish woodpulp fibres under UV light and to look for ribbed paper. So I would sort any remaining stamps into two piles:
- Those on smooth paper, with no ribbing: these must come from BK69. It may not be clear whether they come from the earlier 1971 booklets with the plain covers or the later booklets, but they do come from one of the 25c booklets. The next task will be to sort those further.
- Those on ribbed paper: these will come either from BK69 or BK71.
Then I would take the ribbed papers and sort them further by looking for those papers that are either low fluorescent, or medium fluorescent and which contain at least a sparse concentration of brownish woodpulp fibres, as these are from BK71. That leaves the rest of those stamps as being from BK69.
Then, with the remaining BK69 stamps on the smooth and ribbed papers, look now for tagged stamps with 3 mm OP-2 tagging. Those must come from the later 1972-74 BK69's. That leaves you with OP-4 tagged stamps, which can come from either the 1971 or 1972-74 booklets, and untagged stamps.
The next thing to look for is tricky and requires experience, and that is the appearance of the paper under magnification. You are looking for paper that appears to have no surface coating, and where you can see small loose fibres on the paper surface, or minute depressions in the paper, as these will come from the earlier BK69's. All the later BK69 stamps lack the depressions in the paper and they all have a very light surface coating, which prevents any loose fibres from appearing on the paper surface. The ribbing of the earlier paper is also much more pronounced when viewed against back-lighting that the later booklets, where you can barely see it against back-lighting. Applying this test corectly will allow you differentiate singles from BK69a-y (McCann) or BK69a-c (Unitrade) from all the others (BK69aa-as in McCann and BK69d-k in Unitrade). You can then go about sorting the different levels of paper fluorescence. You can also use shades to a lesser extent: deep brown stamps,without any hint of purple or red, will likely be from the later BK69's, but most other shades will exist with either the earlier or later booklets, so they are not very useful for separating printings into the earlier or later BK69's.
If your stamps are used, the sorting is more difficult, but is still doable. But you have to start with the paper first because you cannot use gum. First, sort the papers into cream paper and white paper (very light cream). Cream papers will be from BK70. White papers will come from either BK69 or BK71.
Taking the cream papers, sort them into horizontal and vertical wove paper depending on which direction the paper bends most easily, without creasing. Horizontal wove will come from BK70.
Taking the white papers, sort them into vertical and horizontal wove papers. The vertical wove papers can come from either the early BK69's or the BK71. Look in this group for non-ribbed, smooth paper. Those stamps must come from the early BK69's. This leaves you with the ribbed papers, which can be early BK69, or BK71. To sort these, look under UV light for brownish woodpulp fibres. If the paper is either low fluorescent or medium fluorescent with obvious woodpulp fibres, it is from BK71. You can then conclude that the remaining stamps on vertical wove paper are early BK69's and can then sort the different paper fluorescences and tagging, etc.
This leaves you with the white papers that are horizontal wove. All of those should come from the late BK69's from 1972-74. There will be a mixture of ribbed and smooth papers, tagged and untagged, as well as different fluorescence levels, which you can then sort, accordingly.
This takes us to the end of the 6c black transportation stamp. Next week, I will deal with the 7c transportation stamp, which is relatively straight forward, and then the following week, will begin on the last of the low value stamps printed by the BABN. This will then place me in position to begin the home stretch of posts: those that deal with the Group of Seven high value designs.
An Important Announcement:
After nearly a year of development, the Brixton-Chrome Website is now live, with over 900 or so stamp listings from the 1917 Confederation Issue through the 1972-78 Caricature Issue. I decided to bring it online sooner, rather than later, so that I could obtain feedback from customers as I develop it and move toward the July 31, 2018 grand opening. So, please feel free to go on there and get acquainted with the layout. Paypal is working now, as are payments by credit card.
You can visit the website by clicking on the following link:
The issues that will be on sale are generally all issues up to the end of the Admiral issue in 1926, and the Karsh and Wilding Issues from 1953-1962.
By far the most exciting aspect to shopping on the website will be the discounts. We give discounts ranging between 5% and 20% on all orders over $10 USD. Customers who register an account with us prior to July 31, 2018, will qualify for a special discount regime, in which they receive an additional 5% off at every level of discount offered, FOREVER. This means that every single order will be discounted by anywhere from 5% to 25%!
To become a registered Brixton-Chrome customer, simply go to the login page from one of the menus located on the home page, at the top, right side or bottom of the page, and follow the instructions. You will need to enter your e-mail address and select a password.
I look forward to your feedback. I plan to gather up all feedback received over the next few months, and engage a professional programmer to assist me to make any required cosmetic and functional changes that customers have indicated would enhance their shopping experience.
Happy stamping everyone!
This takes us to the end of the 6c black transportation stamp. Next week, I will deal with the 7c transportation stamp, which is relatively straight forward, and then the following week, will begin on the last of the low value stamps printed by the BABN. This will then place me in position to begin the home stretch of posts: those that deal with the Group of Seven high value designs.
An Important Announcement:
After nearly a year of development, the Brixton-Chrome Website is now live, with over 900 or so stamp listings from the 1917 Confederation Issue through the 1972-78 Caricature Issue. I decided to bring it online sooner, rather than later, so that I could obtain feedback from customers as I develop it and move toward the July 31, 2018 grand opening. So, please feel free to go on there and get acquainted with the layout. Paypal is working now, as are payments by credit card.
You can visit the website by clicking on the following link:
www.brixtonchrome.com
Feedback received so far these first two weeks from customers has been extremely positive. Most have commented on the ease with which they can browse listings without having to use the search function. Unlike most stamp websites, you can browse by:
- Catalogue number
- Issue
- Item type, i.e. single stamps, plate blocks, booklets, covers, first day covers and cancellations, full sheets, used multiples and varieties.
- Condition and grade, i.e, mint and used, as well as the major condition grades.
- Price range - our stamps are organized into 8 price ranges, from under $1 to over $250.
The base currency of the listings is US dollars because the software that drives the site is hosted out of California. However, there is a currency translation feature that allows you to select a display currency for all the prices that you see as you shop.
My inventory that is currently running live in E-bay will be transferred over to the site over the next 10-12 weeks. 1,500 or so items that were created on E-bay, and that cannot be easily transferred over, will be placed on sale at 25% off the normal prices until July 31, 2018, after which time they will be listed on the website as new listings. If you wish to shop for these stamps, you may access the listings by clicking on the following link:
My inventory that is currently running live in E-bay will be transferred over to the site over the next 10-12 weeks. 1,500 or so items that were created on E-bay, and that cannot be easily transferred over, will be placed on sale at 25% off the normal prices until July 31, 2018, after which time they will be listed on the website as new listings. If you wish to shop for these stamps, you may access the listings by clicking on the following link:
The issues that will be on sale are generally all issues up to the end of the Admiral issue in 1926, and the Karsh and Wilding Issues from 1953-1962.
By far the most exciting aspect to shopping on the website will be the discounts. We give discounts ranging between 5% and 20% on all orders over $10 USD. Customers who register an account with us prior to July 31, 2018, will qualify for a special discount regime, in which they receive an additional 5% off at every level of discount offered, FOREVER. This means that every single order will be discounted by anywhere from 5% to 25%!
To become a registered Brixton-Chrome customer, simply go to the login page from one of the menus located on the home page, at the top, right side or bottom of the page, and follow the instructions. You will need to enter your e-mail address and select a password.
I look forward to your feedback. I plan to gather up all feedback received over the next few months, and engage a professional programmer to assist me to make any required cosmetic and functional changes that customers have indicated would enhance their shopping experience.
Happy stamping everyone!

Very well admin. I am the fan of your writing skill. I will surely share this post. cheers !!
ReplyDeletefrom: entrance exam 2018
tarraMlaya Kenneth Seibert https://marketplace.visualstudio.com/items?itemName=conpernaya.Young-Archaeologist-gratuita
ReplyDeletekarnlongderwea