Pitfalls in Collecting the 1903-1911 King Edward VII Issue
Today's post will address some of the problem areas that you will likely encounter as you collect this issue. The problems fall into three general areas:
1. Fakery designed to fool you into overpaying for cheap items as expensive ones.
2. Repairs or enhancements made for the same purpose.
3. Condition problems that may not be immediately apparent to someone with less experience.
A quick look at the Unitrade catalogue reveals that the relationship between condition and price is extremely steep for this issue - much more so than other issues, where the price differential between grades is 2:1, i.e. for a stamp valued at $100 for VF, F is generally $50, VG is $25 and so on. But with this issue, not only are the NH premiums 250%, the price differential between fine and very fine is as high as 5:1, and on most values it is 3:1, with a similar sharp drop when going from fine to very good.
So as we shall see, the main problems concern gum and centering, and problems that the novice may not notice, or alterations made to transform fine stamps into VF ones.
Problem #1 Faded Colour on the 50c Purple


The first problem concerns colour on the 50c top value of the set. The purple pigment in the ink is unstable and very susceptible to fading when exposed to light for prolonged periods. The true colour is either a deep purple or a deep bright purple. The two stamps shown above both come from the same seller in the US, who has priced them for more or less the same amounts of money. The stamp on the right is the true colour and is a VG used example, which would be F were it not for the heavy roller cancel. The stamp on the left is faded and as such is not even VG, but likely just G.
It would be easy to miss if you were not familiar with the colour and just thought that this was a pale version of the shade. Generally this is not a problem on mint stamps, since those are not usually exposed to light for long periods. However, it is very common with used copies of this stamp.
Problem #2 Disturbed or Sweated Gum Versus Re-Gummed Stamps


On many of the well centered 5c, 7c and 10c stamps, the stamps have been hinged so much that the stamps have small gum soaks caused by the gum seeping through the paper to the front. While this is a minor fault and does affect the price somewhat, one should be careful before jumping to the conclusion that the stamp has been re-gummed or sweated. The paper on this issue is very porous and absorbs gum very easily, so as more and more collectors hinged the stamps and if they moistened the hinges too much, the gum often soaked through to the perforations and sometimes in the centre of the stamp.
Here you can see an example of just such a stamp. Some very eager collector licked their hinge so much that a portion of the gum soaked through to the face and resulted in a small stain to the left of the King's face. While these stamps can of course be soaked to remove the gum, doing so will further reduce their value quite sharply. The demand for well centered stamps of this issue is such that there will still be someone willing to buy such a stamp, if at a reduced price from the catalogued VF price.
Generally, if you see lots of hinge marks or remnants in conjunction with small gum soaks and if the perforation tips do not have any gum where there should not be any, then you are not dealing with a re-gum or a sweated stamp, but just one that has been affected by the amount of hinging it has been subjected to.
Sweating and re-gumming are indeed a problem on this issue though, due to the substantial premiums for NH. Again in the past, when the NH premium stood at 100% only for VF, you did not usually see this too much on F or VG stamps, but now that it is 250%, people are beginning to tamper with F and VG stamps as well, either to sell them for higher prices or for practice to prepare them to make the same alterations to the more expensive VF stamps.
A sweated stamp from this issue will likely have gum soaks due to the porosity of the paper and will appear similar to what I have described above. The gum will look original, but will lack the heavy hinging that one would expect to see based on the appearance of the stamp. Again, such stamps have value, but I would say that a discount of between 25% and 40% would be appropriate, depending on how badly the sweating has affected the frontal appearance and how much gum was left on the stamp originally when the attempt was undertaken.
A re-gummed stamp will have gum that just looks completely different from the gums I have illustrated. The genuine gum on this issue is yellowish to yellowish cream and is either shiny or has a satin, "sponged on" appearance. Very yellow gum, or very light, colourless gums that bear no resemblance to the ones I illustrated in my earlier post on the topic of gum are likely re-gummed. You should be aware that while most re-gummed stamps are NH, not all are. It is possible to find examples of these that were re-gummed a long time ago and hinged in the meantime. So the presence of a hinge mark, does not, by itself guarantee that the gum is genuine.
The best way to tell if the stamp is regummed is to look at the perforation tips. All of these stamps were gummed before being perforated. So when the stamps were separated, there were little tiny microfibres of paper protruding from the perforation tips. You can see these easily if you look at the perforation tips under 10x magnification. When you look at them, you will not see any gum on these fibres on a stamp that has original gum. When a stamp is re-gummed, you will usually see gum in between the perforations or on the perforation tips. This will also happen with sweated stamps, but the difference is that the gum will match that of stamps with original gum, whereas it will not on the re-gummed stamps. Sometimes very expert re-gummers will "sand down" the perforation tips to remove the gum. However, doing so will thin them slightly, and this can usually be detected by immersing the stamp in watermark fluid. On original gum stamps, the paper will have the same colour in the fluid at all points. Thin areas will show up as dark spots.
Finally, there is really no substitute to judging gum than experience. After a while you will get a feel for such attributes as thickness, sheen, texture and colour, and will be able to tell without applying the above tests in many cases. A good suggestion is to try and acquire a lot of VG or G mint examples, and study the gum. In most cases, the gum will be fully original and will provide valuable insight into what to look for when you are ready to purchase the more expensive stamps.
Problem #3 Re-Perforated Stamps
The margins on some of these stamps are quite large, being over 2 mm in many cases. The problem is, the centering of those stamps on the whole is atrocious. This is the reason why the VF price is so high in relation to F and VG. Not surprisingly, fakers have in recent years had a huge incentive to re-perforate the stamps of this issue to convert F stamps into VF stamps. Many years ago, when the 1c and 2c stamps were inexpensive in VF condition (i.e. $20 back in 1990), there was very little incentive to tamper with the 1c and 2c stamps. However, all of the values of this set are now expensive in VF condition, so that one has to be on their guard 100% of the time.
How do you tell if a stamp has been re-perforated? There are several ways. First check the guage - these stamps are perf. 12 all around. Any stamp that is not perf 12 on any side is likely a re-perforated stamp. Another way is the size of the margins - any stamp with a margin of 0.5 mm or less on all sides is likely reperforated if it is well centered, since the margins could be this small on one side for a poorly centered stamp, but not usually this small on all sides. But the third and best way to tell is to take a ruler of your perforation gauge and line the edge up with a pair of opposing vertical or horizontal perforations. The perforation teeth should be directly across from one another, so that the angle of the line formed by the edge of your ruler or perf. gauge should be 0 degrees in the case where you are looking at vertical perforations and 90 degrees where you are looking at horizontal ones. If the angles are significantly off these measurements, then one or both sides is likely re-perforated.
Another clue is the appearance of the perforation teeth themselves. Under magnification, you should see tiny paper fibres on the ends of the perforations where the stamps were separated from one another. On re-perforated stamps, you will not usually see this - the perforation tips will be "clean" with no stray fibes. Also the holes will often be the wrong depth and will not be uniform.
Problem #4 Re-Attached Perforations - Usually in the Top Margin
Occasionally, one finds mint examples where a pulled perforation has been reattached.Often this occurs in the top margin and is hidden by moistening the gum at the top, letting it soak the re-attached perforation and letting it dry. It will just appear at first glance to be heavily hinged. Under magnification though, you will usually be able to see the join if you look carefully.
Problem #5 Faked Imperforates and Fake Booklet Singles
Before the booklet singles were listed separately, back in the 1980's, this was not an issue with the common 2c stamps. But now that the catalogues list the 2c booklet singles for $6-10 each, there is a huge incentive to fake them by trimming down wide margined used stamps on one or two sides.
There are a couple of precautions you can take here to ferret out the fakes:
1. Check the type. Genuine booklet singles are all type II. Type I stamps are likely fakes.
2. Look at the edges. Genuine booklet singles have 1 straight edge at either the top or bottom, or two straight edges at top and right or bottom and right. Generally in the case of the stamps with 2 straight edges, the margins are wide. Stamps with two straight edges that are cut very close to the design could well be fakes, and any stamp with a straight edge at left is fake.
Also, as the booklet panes were guillotined apart from the sheet, the edges are perfectly straight. Sometimes you can detect a fake simply by resting the edge perpendicular to a flat surface. If genuine, the edge will be flush with the flat surface, such as you perforation gauge. If it is not flush, that indicates an unsteady job with a pair of scissors and therefore a fake.
Imperforates have also been faked by trimming down wide margined singles. The margins on these stamps can sometimes be as wide as 5 mm, so just because a stamp has 2 mm margins on all sides, does not guarantee that it is a genuine imperforate. Type I stamps in used condition that appear imperforate are almost certainly fake, as the type I imperfs, were never issued to the public. However, the only way a single stamp can be guaranteed to be genuine is if it has a margin of at least 10 mm on one side, such as a sheet margin copy. Otherwise it is best to insist on collecting these in pairs.
Problem #6 Misidentified 7c Straw Shade Used

The shades of this issue do not generally attract any significant premium with one notable exception: the 7c straw shade in used condition. This was the last printing to be made of the 7c value before the 7c Admiral was issued in its place. For this reason it is actually the most common shade in mint condition, and is worth less than the other shades. But because it was short-lived, nice used examples are very scarce and worth approximately 6-8 times normal.
The genuine straw shade is shown on the left, while the more common olive bistre shade is shown on the right. The date of the cancel, 1903, confirms that it cannot be the straw shade, as the straw shade did not appear until 1911. If you look at the left image, you will see that this shade contains no olive whatsoever, containing only golden yellow. In contrast you can see a clear greenish tinge to the stamp on the right.
The genuine straw shade cannot contain any green or olive. It is best to collect used copies with dated cancellations if you can find them, with 1911 dates.
Problem #7 Faked 2c Type I Mint Stamps
While I have not yet encountered this last problem, I am aware of the possibility that it could arise, so I will address it here.
The type I 2c carmine-rose is valued at double the value for type II in VF condition, while in F condition the differential is three times. So there is an incentive to fake the characteristic break in the upper left inner frameline, by painting them in with white out. The best way to detect these is with a watermark tray and fluid, or under ultra-violet light, where the foreign substance will show up clearly. You could probably also see it with a good 10x magnifier as well.
The only other problem area I have not covered here is in the postal history field where high values are added to covers to create rare frankings. However, that is a problem that affects every issue, not just this one, so I haven't covered it in this post.
My next post will deal with collecting the postal history of this fascinating issue.
1. Fakery designed to fool you into overpaying for cheap items as expensive ones.
2. Repairs or enhancements made for the same purpose.
3. Condition problems that may not be immediately apparent to someone with less experience.
A quick look at the Unitrade catalogue reveals that the relationship between condition and price is extremely steep for this issue - much more so than other issues, where the price differential between grades is 2:1, i.e. for a stamp valued at $100 for VF, F is generally $50, VG is $25 and so on. But with this issue, not only are the NH premiums 250%, the price differential between fine and very fine is as high as 5:1, and on most values it is 3:1, with a similar sharp drop when going from fine to very good.
So as we shall see, the main problems concern gum and centering, and problems that the novice may not notice, or alterations made to transform fine stamps into VF ones.
Problem #1 Faded Colour on the 50c Purple
The first problem concerns colour on the 50c top value of the set. The purple pigment in the ink is unstable and very susceptible to fading when exposed to light for prolonged periods. The true colour is either a deep purple or a deep bright purple. The two stamps shown above both come from the same seller in the US, who has priced them for more or less the same amounts of money. The stamp on the right is the true colour and is a VG used example, which would be F were it not for the heavy roller cancel. The stamp on the left is faded and as such is not even VG, but likely just G.
It would be easy to miss if you were not familiar with the colour and just thought that this was a pale version of the shade. Generally this is not a problem on mint stamps, since those are not usually exposed to light for long periods. However, it is very common with used copies of this stamp.
Problem #2 Disturbed or Sweated Gum Versus Re-Gummed Stamps


On many of the well centered 5c, 7c and 10c stamps, the stamps have been hinged so much that the stamps have small gum soaks caused by the gum seeping through the paper to the front. While this is a minor fault and does affect the price somewhat, one should be careful before jumping to the conclusion that the stamp has been re-gummed or sweated. The paper on this issue is very porous and absorbs gum very easily, so as more and more collectors hinged the stamps and if they moistened the hinges too much, the gum often soaked through to the perforations and sometimes in the centre of the stamp.
Here you can see an example of just such a stamp. Some very eager collector licked their hinge so much that a portion of the gum soaked through to the face and resulted in a small stain to the left of the King's face. While these stamps can of course be soaked to remove the gum, doing so will further reduce their value quite sharply. The demand for well centered stamps of this issue is such that there will still be someone willing to buy such a stamp, if at a reduced price from the catalogued VF price.
Generally, if you see lots of hinge marks or remnants in conjunction with small gum soaks and if the perforation tips do not have any gum where there should not be any, then you are not dealing with a re-gum or a sweated stamp, but just one that has been affected by the amount of hinging it has been subjected to.
Sweating and re-gumming are indeed a problem on this issue though, due to the substantial premiums for NH. Again in the past, when the NH premium stood at 100% only for VF, you did not usually see this too much on F or VG stamps, but now that it is 250%, people are beginning to tamper with F and VG stamps as well, either to sell them for higher prices or for practice to prepare them to make the same alterations to the more expensive VF stamps.
A sweated stamp from this issue will likely have gum soaks due to the porosity of the paper and will appear similar to what I have described above. The gum will look original, but will lack the heavy hinging that one would expect to see based on the appearance of the stamp. Again, such stamps have value, but I would say that a discount of between 25% and 40% would be appropriate, depending on how badly the sweating has affected the frontal appearance and how much gum was left on the stamp originally when the attempt was undertaken.
A re-gummed stamp will have gum that just looks completely different from the gums I have illustrated. The genuine gum on this issue is yellowish to yellowish cream and is either shiny or has a satin, "sponged on" appearance. Very yellow gum, or very light, colourless gums that bear no resemblance to the ones I illustrated in my earlier post on the topic of gum are likely re-gummed. You should be aware that while most re-gummed stamps are NH, not all are. It is possible to find examples of these that were re-gummed a long time ago and hinged in the meantime. So the presence of a hinge mark, does not, by itself guarantee that the gum is genuine.
The best way to tell if the stamp is regummed is to look at the perforation tips. All of these stamps were gummed before being perforated. So when the stamps were separated, there were little tiny microfibres of paper protruding from the perforation tips. You can see these easily if you look at the perforation tips under 10x magnification. When you look at them, you will not see any gum on these fibres on a stamp that has original gum. When a stamp is re-gummed, you will usually see gum in between the perforations or on the perforation tips. This will also happen with sweated stamps, but the difference is that the gum will match that of stamps with original gum, whereas it will not on the re-gummed stamps. Sometimes very expert re-gummers will "sand down" the perforation tips to remove the gum. However, doing so will thin them slightly, and this can usually be detected by immersing the stamp in watermark fluid. On original gum stamps, the paper will have the same colour in the fluid at all points. Thin areas will show up as dark spots.
Finally, there is really no substitute to judging gum than experience. After a while you will get a feel for such attributes as thickness, sheen, texture and colour, and will be able to tell without applying the above tests in many cases. A good suggestion is to try and acquire a lot of VG or G mint examples, and study the gum. In most cases, the gum will be fully original and will provide valuable insight into what to look for when you are ready to purchase the more expensive stamps.
Problem #3 Re-Perforated Stamps
The margins on some of these stamps are quite large, being over 2 mm in many cases. The problem is, the centering of those stamps on the whole is atrocious. This is the reason why the VF price is so high in relation to F and VG. Not surprisingly, fakers have in recent years had a huge incentive to re-perforate the stamps of this issue to convert F stamps into VF stamps. Many years ago, when the 1c and 2c stamps were inexpensive in VF condition (i.e. $20 back in 1990), there was very little incentive to tamper with the 1c and 2c stamps. However, all of the values of this set are now expensive in VF condition, so that one has to be on their guard 100% of the time.
How do you tell if a stamp has been re-perforated? There are several ways. First check the guage - these stamps are perf. 12 all around. Any stamp that is not perf 12 on any side is likely a re-perforated stamp. Another way is the size of the margins - any stamp with a margin of 0.5 mm or less on all sides is likely reperforated if it is well centered, since the margins could be this small on one side for a poorly centered stamp, but not usually this small on all sides. But the third and best way to tell is to take a ruler of your perforation gauge and line the edge up with a pair of opposing vertical or horizontal perforations. The perforation teeth should be directly across from one another, so that the angle of the line formed by the edge of your ruler or perf. gauge should be 0 degrees in the case where you are looking at vertical perforations and 90 degrees where you are looking at horizontal ones. If the angles are significantly off these measurements, then one or both sides is likely re-perforated.
Another clue is the appearance of the perforation teeth themselves. Under magnification, you should see tiny paper fibres on the ends of the perforations where the stamps were separated from one another. On re-perforated stamps, you will not usually see this - the perforation tips will be "clean" with no stray fibes. Also the holes will often be the wrong depth and will not be uniform.
Problem #4 Re-Attached Perforations - Usually in the Top Margin
Occasionally, one finds mint examples where a pulled perforation has been reattached.Often this occurs in the top margin and is hidden by moistening the gum at the top, letting it soak the re-attached perforation and letting it dry. It will just appear at first glance to be heavily hinged. Under magnification though, you will usually be able to see the join if you look carefully.
Problem #5 Faked Imperforates and Fake Booklet Singles
Before the booklet singles were listed separately, back in the 1980's, this was not an issue with the common 2c stamps. But now that the catalogues list the 2c booklet singles for $6-10 each, there is a huge incentive to fake them by trimming down wide margined used stamps on one or two sides.
There are a couple of precautions you can take here to ferret out the fakes:
1. Check the type. Genuine booklet singles are all type II. Type I stamps are likely fakes.
2. Look at the edges. Genuine booklet singles have 1 straight edge at either the top or bottom, or two straight edges at top and right or bottom and right. Generally in the case of the stamps with 2 straight edges, the margins are wide. Stamps with two straight edges that are cut very close to the design could well be fakes, and any stamp with a straight edge at left is fake.
Also, as the booklet panes were guillotined apart from the sheet, the edges are perfectly straight. Sometimes you can detect a fake simply by resting the edge perpendicular to a flat surface. If genuine, the edge will be flush with the flat surface, such as you perforation gauge. If it is not flush, that indicates an unsteady job with a pair of scissors and therefore a fake.
Imperforates have also been faked by trimming down wide margined singles. The margins on these stamps can sometimes be as wide as 5 mm, so just because a stamp has 2 mm margins on all sides, does not guarantee that it is a genuine imperforate. Type I stamps in used condition that appear imperforate are almost certainly fake, as the type I imperfs, were never issued to the public. However, the only way a single stamp can be guaranteed to be genuine is if it has a margin of at least 10 mm on one side, such as a sheet margin copy. Otherwise it is best to insist on collecting these in pairs.
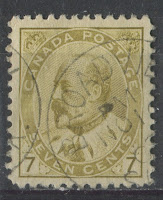
Problem #6 Misidentified 7c Straw Shade Used


The shades of this issue do not generally attract any significant premium with one notable exception: the 7c straw shade in used condition. This was the last printing to be made of the 7c value before the 7c Admiral was issued in its place. For this reason it is actually the most common shade in mint condition, and is worth less than the other shades. But because it was short-lived, nice used examples are very scarce and worth approximately 6-8 times normal.
The genuine straw shade is shown on the left, while the more common olive bistre shade is shown on the right. The date of the cancel, 1903, confirms that it cannot be the straw shade, as the straw shade did not appear until 1911. If you look at the left image, you will see that this shade contains no olive whatsoever, containing only golden yellow. In contrast you can see a clear greenish tinge to the stamp on the right.
The genuine straw shade cannot contain any green or olive. It is best to collect used copies with dated cancellations if you can find them, with 1911 dates.
Problem #7 Faked 2c Type I Mint Stamps
While I have not yet encountered this last problem, I am aware of the possibility that it could arise, so I will address it here.
The type I 2c carmine-rose is valued at double the value for type II in VF condition, while in F condition the differential is three times. So there is an incentive to fake the characteristic break in the upper left inner frameline, by painting them in with white out. The best way to detect these is with a watermark tray and fluid, or under ultra-violet light, where the foreign substance will show up clearly. You could probably also see it with a good 10x magnifier as well.
The only other problem area I have not covered here is in the postal history field where high values are added to covers to create rare frankings. However, that is a problem that affects every issue, not just this one, so I haven't covered it in this post.
My next post will deal with collecting the postal history of this fascinating issue.


Comments
Post a Comment